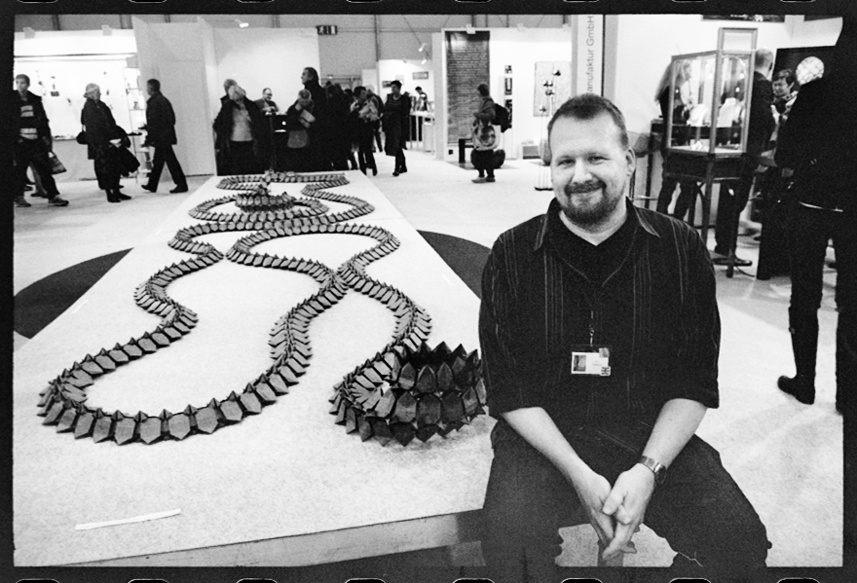
Eric posing in front of work, exhausted but happy!
My partner Ioana Stoian and I were invited as guests of honor for the Salon Résonance in Strasbourg, France last month. One of the requirements of our participation was the creation of a large installation piece, sized for a space about four meters by four meters (or about 150 square feet).
We created an extremely large work, based on my Dragon Helix pattern, using elephant hide sheets cut in to strips and then glued together to achieve a 42 meter long sheet of paper. By my calculations there are over 19,000 folds, 2.86km of creases, and about a month’s worth of actual time folding. It took from June 2012 until October 2012 to fold this thing; I had to stop folding at times because the paper was so rough on my hands that it hurt too much to keep folding. I believe this is one of the largest and most complex origami pieces ever made.
There were over 16,000 visitors during the four days of the art salon, and it seemed like every one of them stopped to look at our piece and then come ask us questions about it. We found ourselves repeating the answers to people in our sleep: “Yes, we folded it, Yes, it’s made from paper, No, we didn’t use any machines or tools, Yes, it’s origami…”
The work is now in storage, but we are actively looking for opportunities to exhibit it elsewhere. I very much enjoyed creating a large-scale piece, and I’m focusing on larger installation work going forward. It’s so rewarding to see the reactions on people’s faces when you make something so large and overwhelming.
The wonderful black and white photos at the end of the photo gallery on this post were taken by our friend Peak, who is a Strasbourg-based photographer from Los Angeles. She was shooting B&W film that day and happened to visit us, and we’re so happy she did!
(for those of you viewing this via email, if you’d like to see the gallery images in full size please visit the website to view them- it’s at https://www.origamitessellations.com/2012/12/giant-installation-piece/.)
-Eric

work sketch

work sketch

we folded 42 one meter strips

playing around

part of a folded strip

folding all the sections

partially finished gluing, in four sections here, rolled and stacked

one fifth the total length of the piece- hanging out of our studio window, down to the ground.

a folded section hanging from our studio window

close-up of a folded section hanging out of our studio window

doing a mock-up in an empty store space in our village

doing a mock-up in an empty store space in our village

doing a mock-up in an empty store space in our village

doing a mock-up in an empty store space in our village

We had to modify our plans, and used an eight meter by two meter platform

installing the piece

installing the piece

the beginning of 16,000 visitors

visitor’s-eye view, with explanation piece in front

on display and our stand in the background

information about the piece: 19,000 folds, 3km of creases, 42 meters of paper, over a month of folding time to make

rolling up the piece to take down the installation

the two giant rolls, waiting to be stacked on each other and crated up for storage

we had many visitors, and they were quite impressed!

Ioana explaining her hand-made paper used in our artworks

Ioana Stoian and Eric Gjerde

The finished piece

Eric posing in front of work, exhausted but happy!